The old Russian stove is a very effective source of heat used for heating country houses, cooking delicious dishes and baking. The energy efficiency of burned firewood is at least 60%, due to which the brick structure is of interest to private developers and homeowners.
This material is useful for beginner stove-makers and home masters who want to organize home heating with their own hands. We propose to study the device of a classic design with a stove bench, then consider the designs and orders of modern versions of the Russian stove.
The device of a traditional furnace
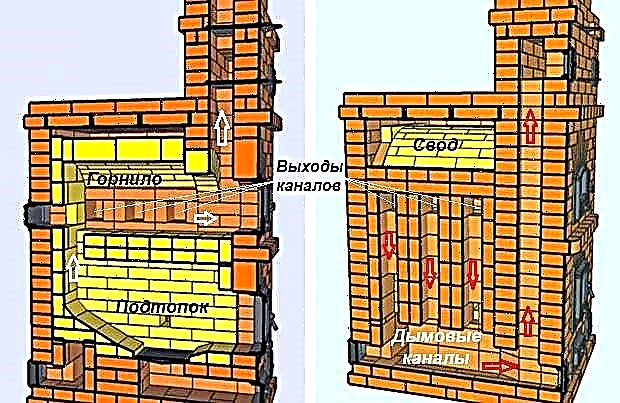
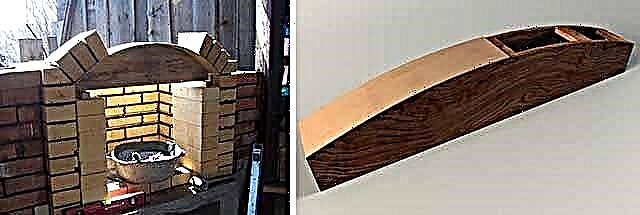
We will not describe the history of the Russian stove and its role in the village house - the topic is widely disclosed in fiction and technical literature. Immediately get to the point - briefly analyze the traditional design shown in the figure below:
- The lower part of the structure - the guardianship - was built of stone or wood - cedar, larch. The walls of the base form a niche - hemp, where firewood was dried and household utensils were stored.
- On top of the guardianship was built the first arched arch and a large firebox of the furnace - a crucible. Under and the second arched arch was made with a bias towards the forehead - the front of the structure.
- Over the crucible, a ceiling was arranged, where the couch was located. The cavity between the second arch of the firebox and the floor was covered with sand to increase the heat capacity.
- A special niche was provided in front of the mouth of the crucible - a boggle, ending at the top with high (smoke collector) and the chimney itself. The horizontal shelf at the bottom of the opening - the six - has a semicircular window facing out.
- In the side walls of the brick heater, small stoves were arranged - small niches for drying clothes and other things. The chimney was equipped with a valve and a view located above the high.

Reference. The history of the evolution of the Russian classical stove is described in great detail in a popular book of the same name, by Gennady Fedotov, published in 2003.
A real Russian stove is fundamentally different from other heating structures made of brick in the following ways:
- deep vaulted firebox made with a forward slope;
- the chimney is located in front - in the center or in the corner of the building;
- an indispensable attribute is a stove bench located above the fuel chamber.

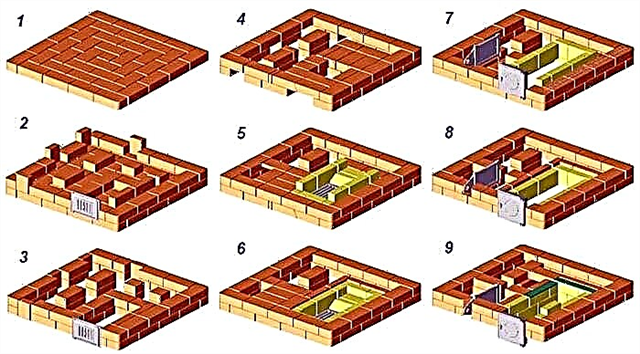
Now consider the principle of operation of the stove, shown in the diagram:
- Firewood is laid closer to the back wall of the furnace and ignited. The combustion air enters through the outer window of the hearth and the mouth of the firebox, and moves over the bottom of the chamber.
- The heat generated during combustion heats the body of the furnace - side walls, sand filling and a stove bench.
- Light combustion products rise to the roof of the furnace. The slope does not allow gases to immediately leave the chamber - first they give off heat to the ceiling, then they become heavier and are replaced by a new hot stream.
- Having passed under the arch of the crucible, the combustion products exit through the upper zone of the mouth, rise into the chimney and leave the stove through the chimney.
Note. In the process of burning, baking bread and cooking is not performed. When the oven is well warmed up, the coals are first scooped out of the furnace, then food is loaded in a metal dish - cast-iron with a grasp. The outlet is closed by a shutter.

Despite numerous advantages, a Russian stove with a stove bench is rarely built in a traditional design. Useful area in a modern interior is worth its weight in gold, and a classic heater takes up a lot of space, while slightly warming the lower zone of the room. For construction, it is better to consider projects of modernized designs where this problem is solved.
Advanced heater options
Modernization of the classical furnace was done by many Russian masters - I. Kuznetsov, I.Podgorodnikov, A Emshanov, A. Batsulin. The essence of the changes is as follows: the details of the old structure were taken as a basis - a vaulted crucible, a bend and a hail above the mouth. New functional elements were added to them:
- Instead of a six, a hob is placed, a small underflood is arranged below. A parallel summer run shaft is laid out, combined at the top with the main smoke collector.
- Red-hot gases from the additional firebox are sent through the smoke circuits made in the lower part - the guardianship. Then the products of combustion are thrown into a common pipe.
- At the end or on the sides of the furnace, vertical channels are arranged, again leading to the lower zone under the firebox, then to the chimney.
- Channels from the firebox go to the attached heating shield and out through the combined pipe.
- The subfloor is made from the bottom of the crucible and communicates with it through the grate installed in the hearth (bottom) of the main firebox. Chimney flues permeate the guardianship and converge into a vertical shaft extending into a chimney.

Note. The changes made allow the furnace to be heated in two ways: in Russian (smoke exits through the mouth and hail) and in the heating-cooking mode (gases move around the channels).

We tried to describe commonly used concepts in an accessible way; there are much more existing options. The purpose of the changes is to improve the heat transfer and functionality of the basic design. If desired, a water circuit register or an oven is mounted inside the flues (the cabinet is placed next to the underfloor).
Now we will analyze in detail the updated options on specific examples - with drawings and orders.
Project mini-oven with stove
The Russian heating and cooking stove Teplushka with an additional combustion chamber has a capacity of 3.5 kW. The construction is designed to heat a small house or cottage with an area of 30-40 m², as well as cooking in the winter and summer. The device of a small heater is shown in the drawing.

The mini-oven is capable of working in 3 modes:
- Summer course. Open the valves 1, 2 and 3 (see the picture), charge the firewood with the fires. Gases immediately go through the main channel into the pipe, the stove is heated. Gate No. 3 plays the role of a hood.
- Firebox in the winter. Again, use the lower chamber, close the gate valve number 1. Then the combustion products move through the crucible and flues in the underfire, exit through the channel to the front side and then to the main chimney. The whole body of the furnace is heated, from top to bottom.
- Firebox in Russian. We kindle firewood in the crucible, open the sealed mouth door and shutter No. 3, valves 1 and 2 are closed. The smoke goes into the hail and the main chimney, only the stove is heated. For proper heating, close the door, open shutter No. 2 - the gases will go through the lower channels of the stove.
Note. The gas flow pattern for various operating modes is shown in the figure.

Due to the efficiency and relatively low cost of materials, a mini-stove can be safely called a housekeeper. One minus is the small size of the bed. The maximum height of the building is 2.1 m, in the area of the ceiling - 147 cm.
Building materials and stove accessories
To make a Russian mini-oven with your own hands, you need to buy accessories and materials:
- full-bodied ceramic brick - 670 pieces (the chimney is considered separately);
- fireclay brick for the furnace - 25 pcs. (mark SHA-8);
- chamotte block brand ШБ-94 or similar in size - 1 pc.;
- the door of the mouth of the main chamber 25 x 28 cm, it is possible with refractory glass;
- loading door 21 x 25 cm;
- ash pan door 14 x 25 cm;
- two grate grates with dimensions of 300 x 250 and 220 x 325 mm;
- wooden template - circle - with a radius of 460 mm, length - 65 cm;
- cast iron hob for 2 burners 71 x 41 cm;
- 3 gate valves: 13 x 25 cm - 2 pcs., 260 x 240 x 455 mm - 1 pc. (brand ЗВ-5);
- equal-angle corner 40 x 4 mm - 3 meters;
- a sheet of steel 1 mm thick for a shelf in a small stove;
- galvanized mesh for reinforcement, mesh 3 x 3 cm - 2.1 m. p .;
- kaolin cotton, corrugated cardboard.


Masonry of red brick is performed on a sand-clay mortar.During the construction of the chimney, the addition of cement M400 is allowed. Refractory stones are placed on another solution - fireclay clay, mortar and the like.
Tip. Beginners are recommended to make mortars from ready-made building mixtures sold in stores.
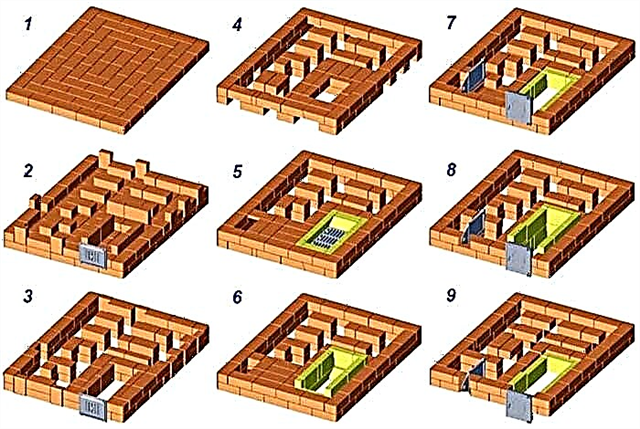
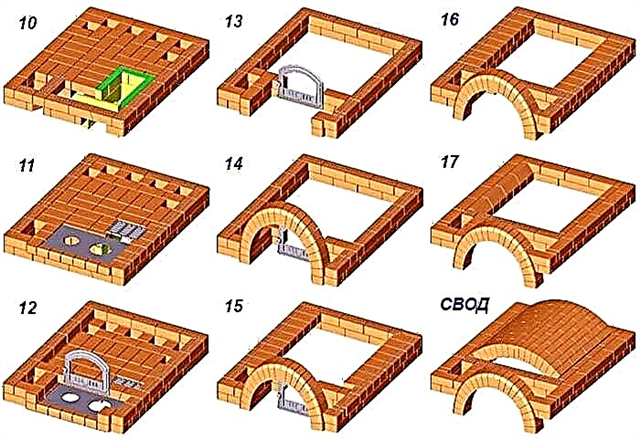
Masonry course - step by step instructions
A reinforced concrete or concrete foundation is cast under the furnace, whose dimensions are 10 cm larger than the dimensions of the structure. Start construction when concrete reaches 75% strength, in normal conditions the solidification process will take about 2 weeks. It implies an average daily temperature of +20 ° C and proper care of the monolith.
Having waterproofed 2 layers of roofing material, make the first row solid (40 bricks will be needed). How to fold the oven according to the rules, read on:
- An ash chamber is formed on 2-3 tiers, a cleaning door is mounted, and columns are built to support the bottom of the furnace. The 4th row continues the main walls of the stove, the ash chamber is blocked by clipped stones.
- Rows 5–6 form the main smoke channel and the bottom of the reflux brick. The grate is placed without a solution, a number of chamotte stones placed on the edge are laid on top.
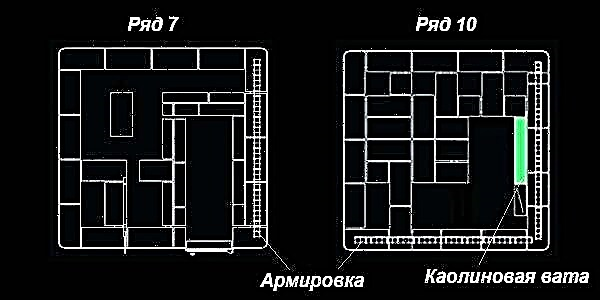
- On the 7th tier, a loading door and a vertical valve of the summer stroke are installed. 7-9 rows are laid according to the scheme, at the end chamotte brick is covered with kaolin wool (marked in green). Please note: on the seventh tier there is a reinforcement of the walls with a steel mesh.
- 10 and 11 rows partially overlap the flues and the lower heating chamber, put the grate for the furnace and the hob. The 12th tier begins to form the main firebox, on the 13th the door is fastened at the mouth of the crucible.

- 14-17 rows are laid according to the scheme, angles are mounted to overlap the cooking opening. On the 18th tier, steel profiles are covered, an arch vault with a radius of 46 cm is made of wedge-shaped stones.
- Tiers 19, 20 are made according to the scheme, the cavity between the arch and the walls is filled with sand or filled with thick masonry mortar. When the filler dries, 21 rows are placed - overlapping.

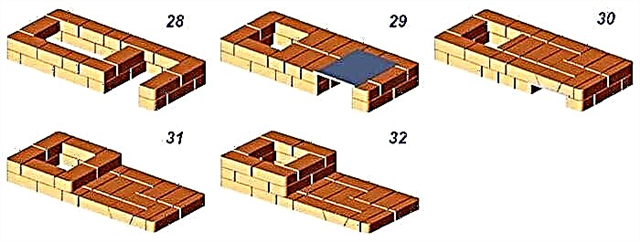
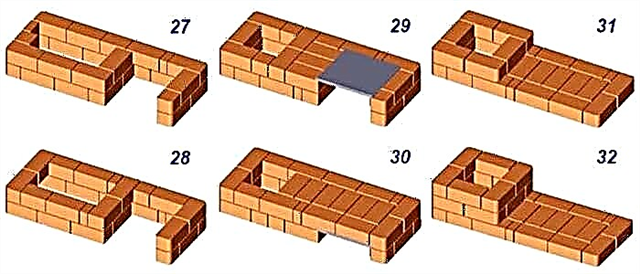
- From 22 to 32 tiers, the front of the heater is being built. On the 24th row, both smoke valves are placed, on the 25th - an iron shelf measuring 42 x 32 cm. Having laid the 29th tier, cover the stove with the same sheet.


Recommendation. Between the ceramic and refractory masonry, make a gap with the usual packing cardboard. Subsequently, the paper will burn out and the gap will remain. The horizontal seams between the red and fireclay bricks are not filled with mortar, only with kaolin wool.
To understand the construction to the smallest detail, we suggest watching a video with a detailed demonstration of the masonry of each row and the wizard's explanations:
Russian "teplushka" with a stove bench 127 x 166 cm
The device and principle of operation of this stove are similar to the previous heat source. The difference is in size, power and some design features. There are also 3 modes available - winter, summer and firebox in Russian. The heat transfer is 4.5 kW, the heated area is 45-50 m².

The size of the furnace in the plan is 1270 x 1660 mm plus 10 cm on the ledge of the foundation. The height of the front part is 210 cm, the beds are 147 cm. A set of materials for construction:
- ShA-8 refractory bricks - 26 pcs.;
- red solid brick - 995 pcs. (the chimney is not included in the indicated quantity);
- chamotte block type ШБ-94 - 1 pc.;
- the main door installed at the mouth - 41 x 25 cm;
- ash pan door 14 x 25 cm, furnace door - 21 x 25 cm;
- 2 grate grates with dimensions of 240 x 415 and 220 x 325 mm;
- stove 71 x 41 cm (2 rings);
- chimney damper type ЗВ-5, size 260 х 240 х 455 mm;
- 2 valves 130 x 250 mm;
- sheet steel 2 mm thick;
- galvanized reinforcing mesh - 1.5 m. p. (cell 30 x 30, wire with a diameter of 1 mm);
- template for forming an arch, radius - 322.5, length - 645 mm;
- circled under the arch of the main firebox with a radius of 60 and a length of 77 cm;
- corrugated cardboard packaging, kaolin cotton wool.

Preparatory work is a reliable foundation device.Keep in mind that after pouring the foundation, the formwork can be removed after 3-4 days (during the warm period), and the furnace can be built only after 2 weeks. The base area is covered with waterproofing - doubled roofing material.
How to put the full-sized “Teplushka” correctly:
- Row number 1 - continuous, consists of 65 ceramic bricks. On the second tier, we begin to form the furnace walls and supporting columns, we put the ash chamber door. 8 stones are installed on a stick without a solution and cut to the height of the 3rd row. We do not associate with the rest of the masonry - these will be cleaning hatches.
- We put the third tier according to the scheme, on the 4th we block the ash pan. On the 5th row, we begin to build the walls of the firebox from the refractory, insert the grate 415 x 240 mm.
- Rows 6 and 7 continue to be laid according to the scheme, fireclay stones are placed on the edge. After the formation of the 7th tier, we mount the furnace door and the summer valve installed vertically. 8-9 rows are built according to the rules.
- On the 10th tier we block the underflood, we cover the upper ends of the refractory bricks with kaolin wool. The front of the camera must be covered with a chamotte block ШБ-94 or similar. We begin to reinforce the walls of the furnace with a galvanized wire mesh, then arrange a second overlap of red bricks (row 11).
- On the finished 11th tier, we insert the stove and the grates of the main chamber - the crucible. Level 12 is done according to the order and we mount a large door. Then we lay out the 13th tier and the arch, using a circle.

- We build rows 14-17 according to the drawings, raising the outer walls of the furnace, the smoke channel and the front wall of the furnace. Next, we put the arch arch R = 60 cm from wedge bricks. We continue to build tiers 18, 19 according to the schemes.

- Twentieth row we close the front arch and raise the outer walls above. We fill the void above the vault with a solution of clay and sand. After drying, build a tier 21 - the plane of the bed.
- Tiers 22–32 make up the front section of the stove, where the hail combines with the side duct. We arrange the rows according to the schemes, at the 24th level we put 2 latches, on the 29th sheet of metal that overlaps the stove.


Building Technology Tips
The construction of a Russian heating stove is a serious matter. It will be very difficult for a homeowner without experience in baking, so we recommend that you stock up on time and patience. Detailed instructions for the preparation of the mortar and masonry we published in an article about the construction of a fireplace, beginners are advised to familiarize themselves with the specified material.
Here we will give general recommendations regarding exactly the Russian home stove:
- Even the mini version of the heater weighs over 2 tons. The foundation slab must be supported on a stable soil horizon, the depth can be determined by the occurrence of the existing base of the dwelling.
- In the finished building, the “sole” must be arranged separately from the foundation of the house, backing at least 10 cm. At the stage of construction of the cottage, the bases, on the contrary, are combined - a common formwork is put out and concrete is poured.
- We need a quality brick and mortar, and not a mixture of ravine clay. The correct geometry of the stones will greatly facilitate your work - uneven bricks will have to be filed.
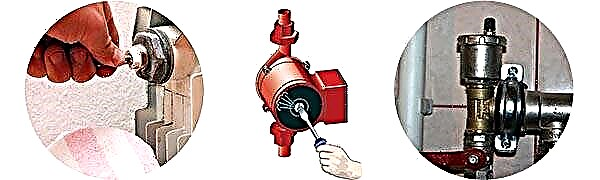
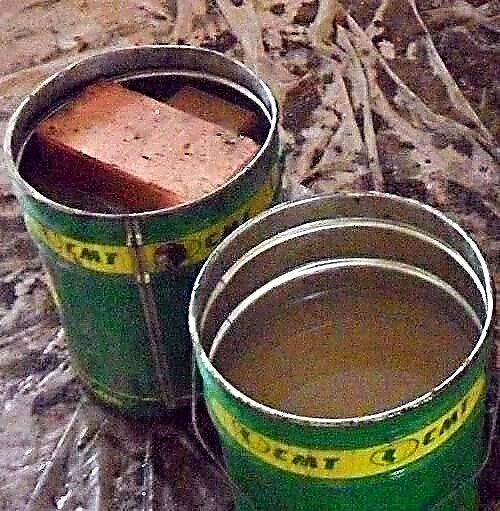
- Soak the red brick in the bucket for 2-3 minutes, as shown in the photo. Do not immerse the refractory in water, only rinse off dust.
- Masonry of a furnace and a firebox made of ceramic bricks is allowed, as our ancestors did. But remember: such cameras are afraid of accidental overflow, the material begins to crumble and crumble.
- A jump in temperature is also afraid of a stove bench, arranged on a loose base. That is why it is recommended to fill the void above the vault with clay solution. If you fill the cavity with sand, small cracks may appear on the ceiling. Before they had time to build a furnace, how to make repairs.
- Refractory masonry is not bandaged with ceramic; cardboard is inserted to provide a gap between the two walls. Horizontal seams are laid with non-combustible kaolin wool.
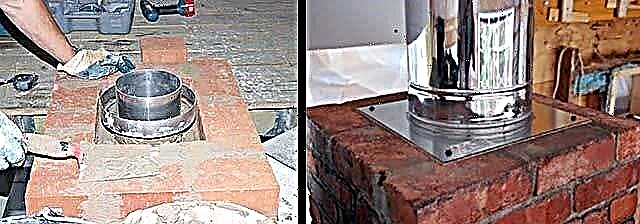
- The pipe does not have to be driven to the top of the brick. Lighten the construction - after cutting, install a sandwich - chimney facing the roof, as shown in the photo.


Reference. Often, stove fenders strengthen the arch and walls with the help of an iron frame welded from the corners.
Finally, a few words about how to properly heat a new stove. After drying the oven for 2-3 days (in summer), first make a small bonfire on the upper damper. When the pipe warms up, begin to gradually heat the crucible, then the lower chamber. The amount of firewood build up slowly, do not rush. The task is to uniformly warm the furnace body for final drying.
Conclusion
With all the desire to describe in detail the construction of the Russian furnace is unrealistic - dozens of years of life have been devoted to the study and improvement of technology. Hence the last recommendation: chat with an experienced stove-maker live - he can tell you about pitfalls and secrets that you can not find on the Internet.